
 Amiga 500
 Amiga 1200
 Amiga 600
 Amiga 4000
 Amiga 3000
 Amiga 2000
 New systems
 Other systems
 Software
 Merchandising

By using this site you agree to the use of cookies for personalised content and analytics.


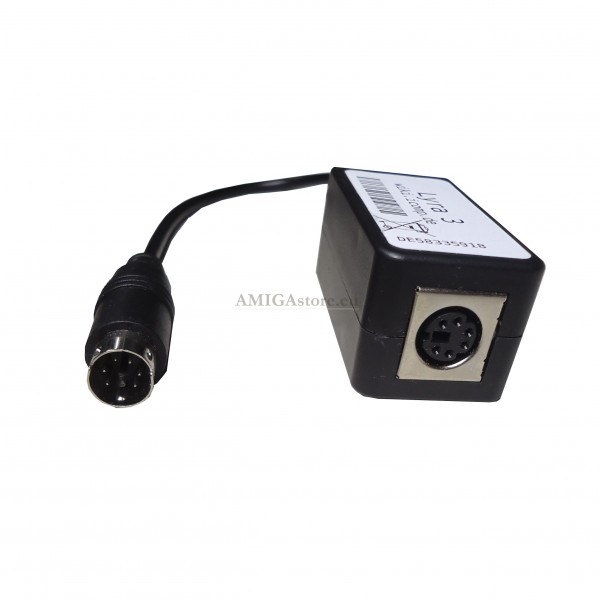

Lyra 3 is a PC keyboard interface for Amiga A1500, A2000, A3000, A3000T, A4000, A4000T, and Commodore CD32, that allows you to connect a regular PC keyboard.
Lyra 3 replaces the older version of Lyra. It addresses numerous suggestions made by customers during past years. This external version for the so-called "bigbox" Amigas is simply plugged between the PC keyboard and the computer.
Additionally, you can use the Amiga keyboard stickers (available at our web) to turn a PC keyboard into an Amiga-friendly keyboard.
Lyra 3 is compatible with all PS/2 keyboards and USB keyboards that support the PS/2 protocol (these are easily identified by the adapter that's shipped with the keyboard). Lyra 3 is also perfect for use with a KVM switch.
Lyra 3 lets you use a PC keyboard as an Amiga keyboard. This adapter lets you do distinct changes to the keymap for certain keys, giving you lots of options that would require a lot of different keymaps, but also a lot of jumpers. Lyra 3 makes use of non-volatile memory: all configuration data is stored in flash memory of the adapter.
If the PC keyboard of your choice has additional keys (so-called "multimedia keys"), these can also be used with this product: Lyra 3 supports the "stealth protocol", which was invented by Guido Mersmann. It transfers all key codes of a multimedia key in a manner that does not interfere with normal software. If Guido Mersmann's "MMkeyboard" driver (available for Amiga Classic and PPC/UAE) is installed, you can assign functions to all the multimedia keys of your keyboard.
The cherry on the cake is Lyra 3's feature to support a full-custom keyboard mapping. Thomas Richter's Lyra3Tool (available as free download) allows you to change the mapping not just for selected keys, but for all keys of the keyboard, including multimedia keys.
Please note that Lyra 3 comes with a mini-DIN connector for the A4000D computer. If you want to use the unit with an A2000, A3000, 3000T or A4000T, you need an additional mini-DIN to DIN adapter available a option in this page.
Configuring Lyra 3 can be done without drivers, just by hitting the right key combinations. All configuration data is saved in non-volatile memory, so Lyra 3 will remember it even if you switch off power of your Amiga. The magic key combination that lets you enter configuration mode is L-Shift+Pause. This means that you press and hold the left shift key, and while holding it, you press the Pause key. Lyra 3 acknowledges configuration mode by flashing the ScrollLock LED. You now have the chance to toggle a few options, to display the current configuration or to leave configuration mode.
The product is delivered in an external black case. The cable is about 21cm (8.2 inches) long. Lyra 3 for BigBox Amigas is an "online manual only" product - there are no printed instructions with this product. The short manual may be found below.
DETAILED INSTRUCTIONS ABOUT IT'S CONFIGURATION:
General
Lyra 3 lets you use a PC keyboard as an Amiga keyboard. It replaces the older version of Lyra. It addresses numerous wishes of our customers that have reached us in the past.
Lyra 3 lets you do distinct changes to the key map for certain keys, giving you lots of options to adapt your favourite keyboard. In addition to that, you can set a custom key map with the configuration software.
Lyra 3 is currently only available as external version for the so-called "bigbox"-Amigas. It is simply plugged between the PC-keyboard and the computer. For A2000 and A3000 models, a simple PS2-adapter is necessary. With an A4000, a direct connection is possible.
Entering configuration mode
Configuring Lyra 3 is done without drivers, just by hitting the right key combinations. All configuration data is saved in non-volatile memory, so Lyra 3 will remember it even if you switch off power of your Amiga. The magic key combination that lets you enter configuration mode is L-Shift+Pause. This means that you press and hold the left shift key, and while holding shift, you press the Pause key. Lyra 3 acknowledges configuration mode by flashing the Scroll Lock LED. You now have the chance to toggle a few options, to display the current configuration, to leave configuration mode or reset the whole configuration to factory-default.
If you have entered configuration mode accidently, you just press the ESC key to leave it, and all configuration data is left unchanged. Lyra 3 stops flashing the Scroll Lock LED, and brings back the LED to the state that it has been set to in your previous configuration session.
In configuration mode, function keys F1 through F12 can be used to toggle seven different settings. Pressing any of the following keys will toggle a setting and leave configuration mode again. If you want to change two configuration bits, you need to re-enter configuration mode for the next setting.
F1: toggle page mode
This configuration setting is equivalent to pressing the Scroll-lock key outside the configuration mode. It toggles the page mode for these four keys:
| key on PC keyboard | page mode "shift" | page mode "ALT" |
| Pos 1 (home) | shift-cursor left | ALT-cursor left |
| End | shift-cursor right | ALT-cursor right |
| PgUp | shift-cursor up | ALT-cursor up |
| PgDn | shift-cursor down | ALT-cursor down |
The page mode is always displayed with the scroll-lock LED of the keyboard: If the LED is on, the above four keys are transferred with the ALT qualifier. If the scroll-lock LED is off, then the above four keys are sent to the Amiga with the SHIFT qualifier.
F2: Toggle NumLock LED
This key lets you toggle the state of the NumLock LED. This might be a matter of taste for most customers, but there are keyboards that switch keymaps with the NumLock LED, therefore it might be necessary to adapt this setting if you want to use such special keyboards. Especially if a small-sized keyboard does not have a numeric keypad (similar to laptop keyboards), the NumLock LED often switches on an embedded numeric keypad that's usually indicated on the keys with a different colour printing. Other than that, this setting does not change anything on the keymap of Lyra 3.
F3: Swap ALT and Amiga
This setting swaps the Amiga and ALT keys. Lyra 3 assumes by default that you want the ALT keys mapped to the ALT keys on the Amiga side, and that you want the Windows-keys to be mapped to the Amiga-keys. Although this sounds most logical, it doesn't get close enough to the original Amiga keyboard layout, because most PC keyboards have the ALT keys right next to spacebar, whereas the Amiga has the Amiga keys directly next to spacebar. By pressing F3, the ALT and Amiga key are swapped. Please note that this setting may also affect your right CTRL-key (see further down).
F4: Toggle Win-menu key
The third Windows-key is often referred to as the menu-key or the application-key. With Lyra 3, you can map this key either to the key-combination L-Amiga-m (which toggles screens), or to a generic stealth-message that can be used by Guido Mersmann's fantastic MMKeyboard. Read more about stealth messages further down. By pressing F4 in configuration mode, you toggle between the two choices.
F5: Toggle slash-key on numeric keypad
The Amiga keyboard has the two braces [ and ] in the top left corner of the numeric keypad, therefore Lyra 3 always maps the NumLock key the the opening brace [. Right next to the NumLock key, the regular PC keyboard has the slash or divide key. By pressing F5 in configuration mode, you toggle between two choices: Either the divide key transfers a closing brace ] to the Amiga, or it transfers the keycode for the forward slash (divide key) to the Amiga.
F6: shuffle numeric keypad
As the title already says, this configuration moves around a few keys on the numeric keypad. Since the Amiga has a rich numeric block with a total of 18 keys, there's a little more room than on normal PC keyboards these days. However, since some international keyboards also have 18 keys on the numpad, you might be lucky and your keyboard is already prepared for the 18th key. If you feel you are technically skilled, you can remove the large plus-key and see if there's space for two regular key caps instead of the big plus-key. If you can install this additional key, then the shuffle-configuration is your friend, as it moves all keys on the numeric keypad to where a real Amiga user expects it:
| key on PC keyboard | effect on Amiga when shuffled |
| * | / |
| - | * |
| + | - |
| new-cap | + |
The star (multiply)-key becomes slash (divide), the minus-key becomes the star (multiply)-key, the former plus-key sends the Amiga-minus code, and the new key-cap that you have installed will send the plus-key to the Amiga.
F7: Toggle Jumper pin behaviour
There's a jumper pin inside of Lyra 3 that is open by default. Closing this jumper doesn't make sense for the "bigbox" version of Lyra 3, as it puts Lyra 3 into a passing mode that allows using an Amiga keyboard. This passing mode has been implemented for the forthcoming version of Lyra 3 for A1200.
For the case that the jumper is open, the signal pin can be programmed to have a selectable state, and you can choose if this pin can be toggled by pressing l-Amiga and Pause. By pressing F7 in configuration mode, you toggle the ability to use l-Amiga and Pause or not. Note that only the powerup-state of this pin is stored in the non-volatile memory of Lyra 3. The state that you've chosen with l-Amiga and Pause is not stored. Also see further down for F11 configuration.
F8: toggle Stealth messages
Stealth messages are key-codes that normally have no meaning to any program on the Amiga, because they are composed of a series of so-called key-up codes. In other words: The computer believes that you are releasing certain keys, so no action is started. The fact that you haven't pressed these keys in the first place is ignored by most programs, therefore this method was named "stealth" by it's inventor Guido Mersmann. Stealth messages are used by his program MMKeyboard that Individual Computers has licensed. Although we have already paid Guido for his work, you might find his program so useful that you want to donate some more to his ongoing work for the Amiga. We surely encourage you to do so! Since stealth messages are not totally invisible to the computer, they might disturb special programs or affect gameplay. In the unlikely event of an incompatibility with your software, you can switch stealth messages off by hitting F8 in configuration mode.
F9: configure TICK pin
There is another "free" pin on the chip of Lyra 3 that is available inside the Lyra 3 case. This pin can be programmed to be a 50/60 Hz output, or to be a static output. By pressing F9 in configuration mode, you toggle between frequency output and static output.
F10: configure TICK frequency/state
This configuration bit configures the TICK pin's state or frequency (depending on your F9 setting): If the TICK pin is in frequency output mode, pressing F10 in configuration mode will toggle between 50Hz or 60Hz output. Please note that the frequency is far from being accurate: It may deviate up to 0.5% from your selected frequency, because the time base of the Lyra 3 controller chip is not a crystal. However, for your own project where you use a power supply that doesn't provide a TICK signal, Lyra 3 will give an alternative source for this frequency.
If the TICK pin is in static output mode, then pressing F10 in configuration mode toggles it's power-up value. Further, pressing l-ALT and Pause will toggle this pin's state, but it will not save this selection. This programmable pin can be used to switch hardware extensions on/off that would otherwise require a switch (Kickstart switchers, memory expansions, bootselectors).
F11: toggle jumper pin power-up value
By pressing F11 in configuration mode, you toggle the power-up state of the jumper signal pin.
F12: configure right CTRL key
Some PC keyboards lack the right "Windows" key, which would result in losing either the right Amiga-key or the right ALT key for your Amiga. Since the real Amiga keyboard does not have a second CTRL-key, Lyra 3 lets you configure the right CTRL-key as either another CTRL key, or the right Amiga-key. If you have chosen the latter, then your choice of swapping ALT and Amiga keys is also applied to the right CTRL key, as otherwise you'd end up with two right Amiga-keys, but no right ALT key.
TAB: display configuration
If you don't remember your configuration, Lyra 3 can display it in clear text. Just open a text editor or a word processor where you can type several lines, enter configuration mode by pressing L-Shift and Pause, then hit the TAB key and Lyra 3's configuration will be written in clear text on screen. Since memory inside the translator chip is very limited, Lyra 3 will display the shuffled numeric keypad as "18-button" for "shuffled" and as "17-button" for the regular numeric keypad. The block of text is avoiding the characters Z and Y in order to be compatible with as many keymaps as possible. We must send apologies to those people in French-speaking countries, because Lyra 3 can't know about the keymap that is set in your Amiga, so the block of text will most probably not be clear text, but garbage for those in France, the French-speaking parts of Belgium, Switzerland or Canada. We recommend to switch to US keyboard layout in order to view Lyra 3's configuration.
ESC: Leave configuration mode
If you press ESC in configuration mode, you leave this mode without doing any changes. If ESC pressed together with the right Shift key during configuration mode, Lyra 3 will go back to it's factory setting and erase all your settings. Caution: This is done without further warning! However, with the right Shift key as required qualifier for this action, we believe that we have chosen some good safety measure.
l-Shift+Backspace: lift write protection
Lyra 3 allows editing the translation map from PS2 to Amiga-keys. We'll publish a command line tool shortly that lets you backup the existing translation map, or upload a new translation map. By pressing l-Shift and the backspace key in configuration mode, you take away the write protection, thus allowing the tool to make changes to the translation map inside of Lyra 3.
Please note that the Scroll lock LED stops blinking in this mode, although you are still in configuration mode. This is required to reduce traffic on the PS2 side of Lyra 3 to a minimum, as EEPROM erase/write operations may temporarily break PS2 communication.
Should you get nervous or for some reason change your mind, you can always press ESC and leave configuration mode, which will re-enable write protection at the same time. The command line tool will also give you information about what's currently going on, so the blinking LED is not really required. Further, the command line tool will end configuration mode and re-establish write protection when it's done. The one thing that cannot be done purely from the Amiga side is to lift write protection: This will always require user interaction, otherwise the translation table of Lyra 3 will remain untouched.
A few keys are left to explain:
F11 and F12 will always translate to the two braces [ and ] as on the numeric keypad of the Amiga. The Insert key is translated to the help key of your Amiga. PrintScreen is translated into the key (backslash). Most PC keyboards only have two keys between backspace and the 0-key, while the Amiga has three keys between them.
hot-plug behaviour
As opposed to earlier versions of Lyra, this new version implements measures to be hot-plug compatible with the Amiga. When hot-plugged, Lyra 3 tries to achieve sync with the Amiga by sending 1-bits until the computer acknowledges a keystroke for the first time. This behaviour is specified by Commodore, and it will essentially shift in a "garbage" byte into the computer. However, since the last bit to be transferred is a "1" bit, the computer will believe that whatever bits were found before, a key has been released and not pressed. Quoting Commodore's hardware reference manual: "the damage should be minimal".
While this works in many cases, it still happens that a garbage key is displayed, and that software believes that this garbage key is still pressed (especially the configuration software for setting a custom key translation map). We'd like to emphasize that this is not a defect of Lyra 3, but a shortcoming of the hot-plug behaviour and the keyboard protocol, which does not implement a checksum or a parity bit. Should you experience problems after hot-plugging Lyra 3, then these problems will be gone after a power-cycle of your Amiga.
reset warning
For the first time, Lyra 3 implements the "reset warning" feature. If you press CTRL, l-Amiga and r-Amiga at the same time, Lyra 3 will send a reset warning code to the computer. Only if this code is properly acknowledged by the computer, Lyra 3 will execute the actual reset. Should the acknowledge from the computer come late, the reset will be delayed by up to ten seconds. This will let you use programs like "DiskSafe" (see Aminet), and protect you from possible data loss.
Full-custom keyboard layout
In addition to configuring single keys with the options mentioned above, Lyra 3 allows you to choose a full-custom keyboard mapping. Thomas Richter has written a tool for that, allowing expert users to create their own keyboard mapping.

Bank Transfer
Payment systems


